 Skip to main content
If you are facing issues with your Xerox VersaLink C7030 printer due to a malfunctioning fuser, don't worry. We have got you covered with this comprehensive guide that will help you replace the fuser with ease. Matthew, a professional from The Printing Workshop, has shared a step-by-step tutorial to ensure you can fix your printer without any difficulties.
If you need more information on what to do when printer supplies are low, read our blog on how to order supplies for your copier/printer.
Note: This guide can also be used for the Xerox VersaLink C7020 and the Xerox VersaLink C7025 printer models.
Step 1: Power Down the Machine
Before diving into the fuser replacement process, powering down your Xerox VersaLink C7030 is crucial. This initial step ensures your safety and prevents any potential damage to the printer during the replacement.
Note: For the Xerox VersaLink C7020/C7025/C7030 printers, the fuser is the same on the color model and black and white model, so they are interchangeable.
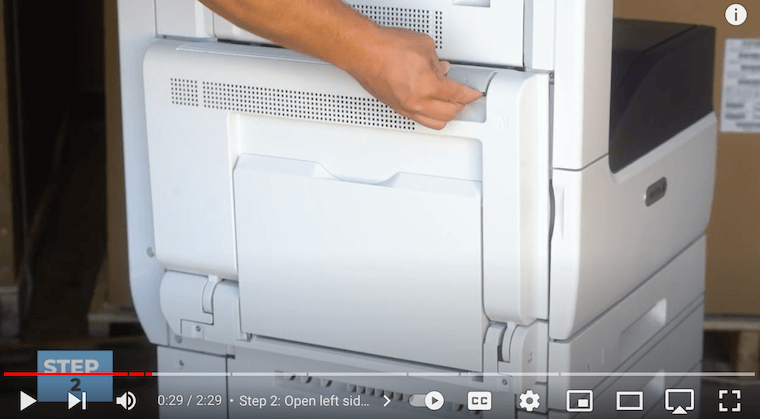
Step 2: Open the Left Side Door
Open the left side cover by pushing up on the gray latch. Inside, you'll find the fuser, marked with an "R8" label and heat warnings. Take caution, as the fuser can be hot.
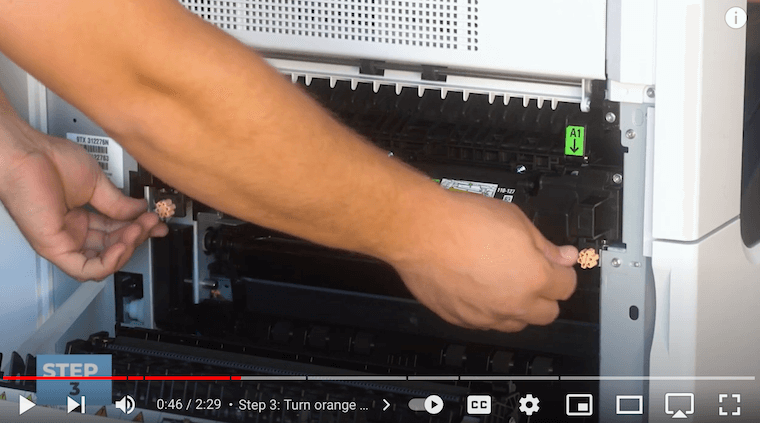
Step 3: Turn Orange Knobs Counter-Clockwise
Proceed by loosening the two orange finger screws underneath the fuser by turning them counterclockwise until they feel loose.
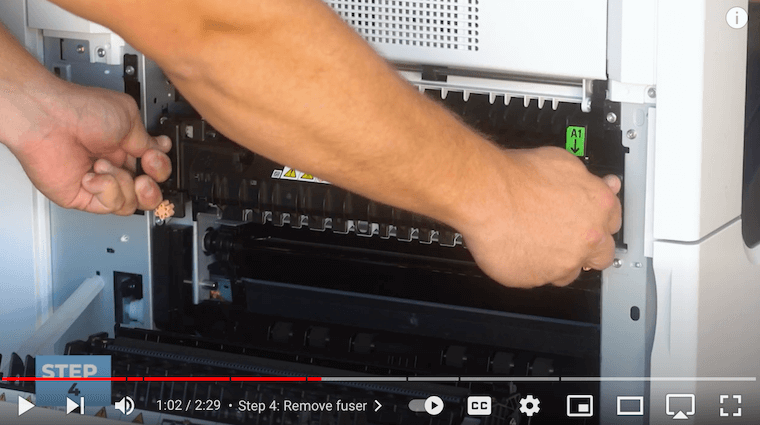
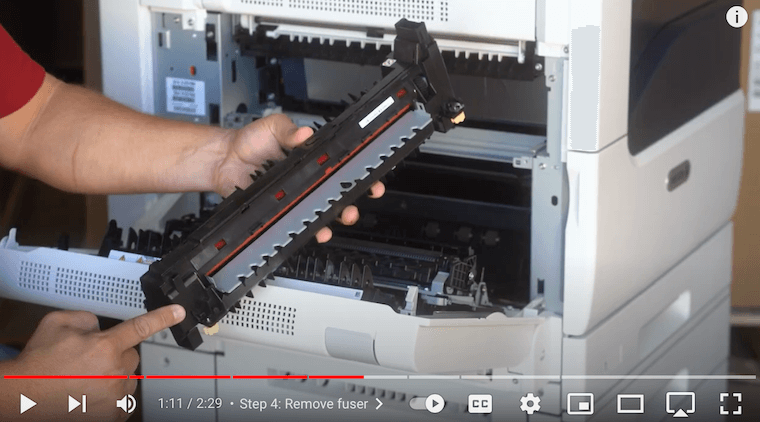
Step 4: Remove the Fuser
Gently pull the fuser straight out by grabbing the two black handles at each end of the fuser. It is important to handle the fuser carefully to avoid burns. With the old fuser out, you're ready to introduce the new one.
Step 5: Insert the New Fuser
Unbox your new fuser and slide its ends (in the first picture below) onto the metal slide areas (in the second picture below), ensuring that the "A1" and "R8" labels are in a readable position. Once in position, give it a good push to secure it in place.

Step 6: Turn Orange Knobs Clockwise
To secure the new fuser, turn the orange finger screws clockwise. This step involves a bit of finesse, as you'll want to screw them back into the frame of the machine. Make sure to do this on both sides until the fuser is securely in place.
Step 7: Close the Left Side Door
With the new fuser successfully installed, close the left side door. Ensure that both the front and rear latches are securely fastened. This step is crucial to maintaining the proper functioning of your Xerox VersaLink C7030.
A Seamless Fuser Replacement Guide for Optimal Performance
You have embarked on a journey to enhance your printing experience by learning how to replace the fuser in your Xerox VersaLink C7030 printer. Our comprehensive guide has provided you with step-by-step instructions, ensuring a seamless process to revitalize your printer's performance.
This blog is designed to empower you to take control of your printing capabilities, troubleshoot issues, and maintain peak performance with ease. You no longer have to struggle with printer issues; you are now equipped with the knowledge to confidently replace the fuser.
Take charge of your printing destiny! Don't just read - implement. Follow our guide, upgrade your Xerox VersaLink C7030, and enjoy hassle-free printing.
Want to know if your printer needs to be replaced? Consider our blog on the 4 signs it may be time for a new copier printer (2023).
Want more expert tips?
Make the most of your Xerox VersaLink C7030 printer with the insightful tutorials found on our YouTube channel The Printing Workshop. Don't miss out on the opportunity to learn effective maintenance and troubleshooting skills. Remember to hit that like and subscribe button to stay updated with our latest videos. Happy printing!
Do you need help with a complex printer issue? Contact us now to get in touch with a trained technician from STPT who can help you resolve the issue.
