 Skip to main content
Are you having issues with your Xerox VersaLink C625 because your toner needs replacement? Low toner levels can greatly impact your printer's performance and lead to poor print quality and frustrating interruptions to your work. The good news is that replacing toner is a simple process that takes only a few minutes.
In this blog, we’ll guide you through the straightforward process of replacing the toner in your Xerox VersaLink C625.
At Strategic Technology Partners of Texas (STPT), we have serviced thousands of printers and resolved this issue countless times. With our expertise, we can confidently assist you in maintaining your printer. Leading you through this process is Matthew, our seasoned printer technician with years of experience in printer repairs.
Why and When to Replace Your Toner
Toner cartridges are crucial for producing high-quality prints. Over time, the toner in these cartridges depletes, leading to faded prints and even potential damage to the printer if not replaced promptly. Common signs that it’s time to replace your toner include streaky prints, faded text, or most importantly a printer alert indicating you need to replace it. Regularly replacing your toner ensures that your documents maintain their professional quality and prevents more severe printer issues.
By following this step-by-step guide, you will ensure that your printer runs smoothly and continues to produce high-quality prints consistently.
If you are not currently signed up for automatic toner shipments, please visit our dedicated auto-toner shipments blog to learn more about our service.
Step 1: Open the Right-Side Cover (B)
The first step in replacing the toner is to open the right-side cover, which is labeled as ‘B’. Locate the cover on the right side of your Xerox VersaLink C625. Once you’ve found it, swing it open. You’ll notice it swings out easily.
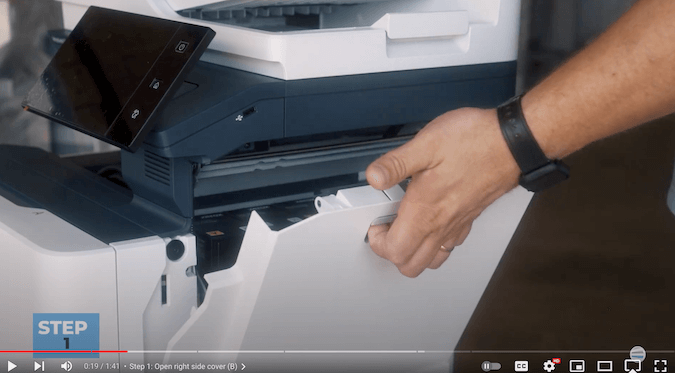
After that, lift the cover up to expose the toner cartridges.

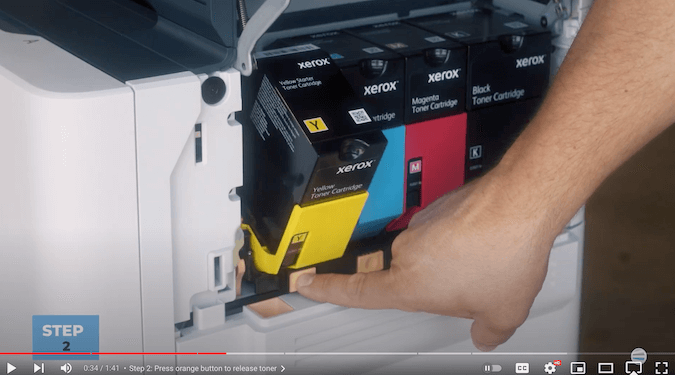
Step 2: Release the Toner
Once you’ve opened the right-side cover, you’ll see the toner cartridges lined up. To remove a toner cartridge, simply press the orange button located at the bottom of the toner. This button releases the toner cartridge from its slot. You’ll notice it swings out slightly, making it easier to grab.
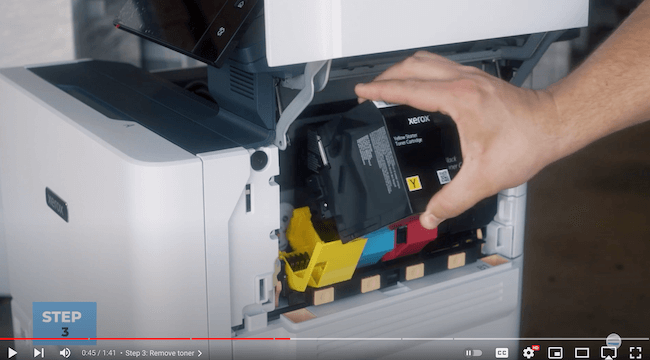
Step 3: Remove the Toner
Now, it’s time to remove the toner. Focus on the black box of the toner cartridge and leave the colored part in place. Grab the black box firmly, pull it up, and then out.
Replacing Toner on Xerox VersaLink C625_Step 1 Open Side Cover
Before moving on to installing the new toner, it’s important to note a crucial detail about the new style of toner. If you are using return-style part number toners, Xerox requires you to send back the empty toner cartridges. Make sure to use the original box to return the empty toner cartridge to Xerox. This practice not only helps in recycling but also ensures that you comply with Xerox’s policies. Read our blog on toner cartridge recycling to learn more.
Step 4: Insert the New Toner
Now that the old toner cartridge is removed, it’s time to insert the new one. Take your new toner cartridge and set it into the colored slide where the old one was located. Let it go down into its place naturally.

Once it’s in position, push it back until you hear a click, indicating it’s locked securely into place.
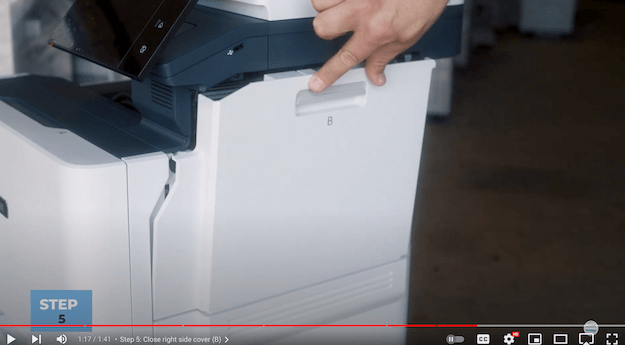
Step 5: Close the Right-Side Cover (B)
You can now close the right-side cover. First, swing the bottom of the cover down, ensuring that the bottom part of the cover makes contact and aligns correctly.
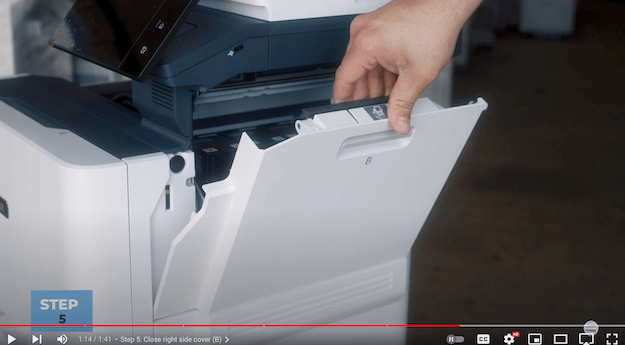
Then, swing the cover upwards until it clicks into place. This ensures that the cover is properly closed and the printer is ready for use.
Choose Quality Toner
And that’s it! Replacing the toner on the Xerox VersaLink C625 is as simple as opening the cover, releasing the old toner, inserting the new one, and closing the cover. Regular maintenance, like replacing toner cartridges, keeps your printer in optimal condition, ensuring high-quality prints every time. To get the highest quality prints, we recommend using OEM toner. However, for a more affordable option, newly manufactured compatible toners like Xerox Everyday Toner are also a great choice. We encourage you to use toner from reliable and reputable manufacturers to avoid damaging your printer or voiding any printer warranty you might have. To learn more about toner types, check out our blog on the 4 Different Types of Printer Toners.
Want More Printer Tips?
If you found this guide helpful and want to see more videos or guides on maintaining your Xerox VersaLink C625, make sure to check out our YouTube channel, The Printing Workshop. By subscribing to our channel, you’ll be the first to know when we upload more useful printer tips and tutorials. You can also read the written versions of our tutorials and find other insightful blogs in our Learning Center.
If you have any questions about toner for your printer or need extra assistance, don’t hesitate to contact us. Our experienced printer technicians are ready to help.
