 Skip to main content

Replacing the fuser on your Xerox VersaLink C400 or C405 is not complicated. However, there are two things you absolutely need to get right: powering the printer down first and handling the fuser carefully because it can get very hot.
The fuser is the part of the printer that uses heat and pressure to bond toner permanently to the paper. Because it operates at high temperatures and handles every printed page, the fuser gradually wears out over time. When it reaches the end of its service life, the printer may prompt you to replace it, or you may begin noticing print-quality problems such as toner that does not fully adhere to the page.
At Strategic Technology Partners of Texas (STPT), we’ve serviced thousands of printers and handled fuser-related repairs thousands of times.
In this guide, Matthew from The Printing Workshop, a printer technician with several years of hands-on repair experience, shows you how to replace the fuser on a Xerox VersaLink C400 or C405. You will learn how to remove the old fuser safely, line up the replacement correctly, avoid a common 010 error, and get your printer back up and running. The process will be the same for the Xerox VersaLink B400 and the B405.
Table of Contents
- What Is a Printer Fuser?
- When Should You Replace the Fuser?
- How to Replace the Fuser on a Xerox VersaLink C400 or C405
- Common Fuser Replacement Mistakes
- Quick Recap
- FAQ
- Why Proper Fuser Replacement Matters
Short Answer: Fuser Replacement on Xerox VersaLink C400/C405
To replace the fuser on a Xerox VersaLink C400 or C405, power down the printer first, open the rear cover, squeeze the gray release button, pull the old fuser straight out, align the new fuser with the guide slots, push it firmly into place, close the rear cover, and restart the printer.
What Is a Printer Fuser?
A printer fuser is the component that uses heat and pressure to permanently bond toner to the paper.
After toner is applied to the page during the imaging process, the paper passes through the fuser. The heated rollers melt the toner particles and press them into the paper fibers, which creates the finished print.
Over time, however, the fuser wears down as it heats up every time you print.
When Should You Replace the Fuser?
You should replace the fuser when your Xerox VersaLink C400 or C405 displays a fuser replacement message, reaches the end of the fuser’s expected service life, or develops print-quality problems related to toner adhesion.
Signs of a worn or failing fuser can include:
- Toner rubbing or flaking off the page
- Smudging or streaking
- Repeating print defects
- Wrinkled or poorly fused pages
- A fuser replacement or service message
If the printer tells you that the fuser needs replacement, it is best to address the issue rather than continuing to print indefinitely. A worn fuser can affect print quality and may eventually prevent the machine from operating normally.
How Do You Replace the Fuser on a Xerox VersaLink C400 or C405?
The fuser sits behind the rear cover of the printer. Replace it by powering the machine down, releasing the old fuser, aligning the new one with the guide slots, and securely seating it before restarting the printer. Below we go into more detail.
Step 1: Power Down the Printer
Before touching the fuser, turn the printer off.
If you replace the fuser while the machine is still powered on, it can trigger a 010 error.
Powering the printer down also gives the fuser an opportunity to cool, as it operates at high temperatures.
Step 2: Open the Rear Cover
Once the printer is powered down, open the rear cover.
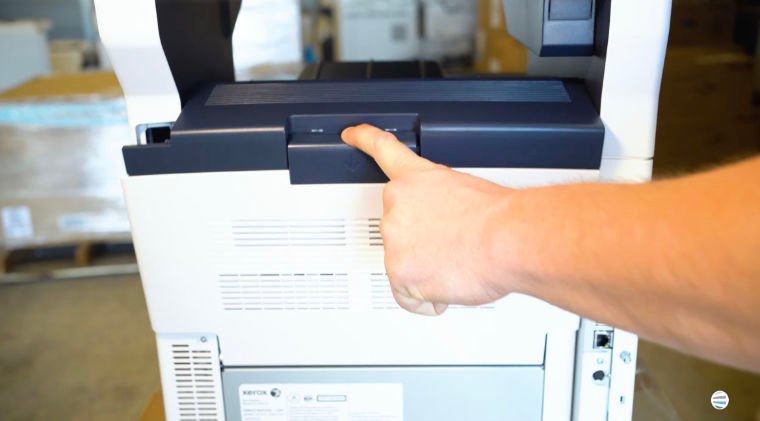
Inside, you will see the fuser identified by its green handles.
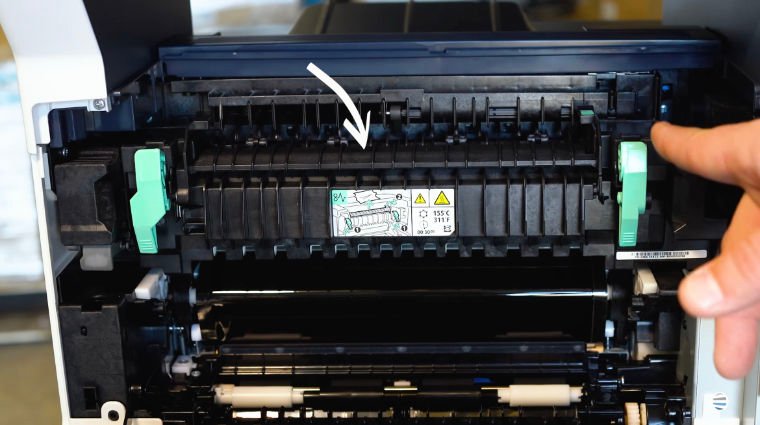
The fuser is positioned so that it can be removed directly from the rear of the machine.
Step 3: Locate the Release Button and Hand Grips
Before pulling the fuser out, identify the areas designed for safe handling.
On the lower-left side of the fuser, you will find a gray squeezable release button. Above that area is a ridged thumb hold.
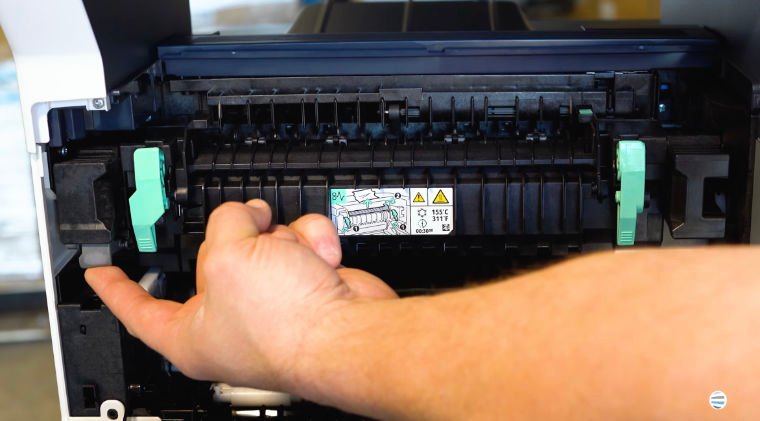
The opposite side of the fuser also has a thumb hold and ridged area where you can support the component with your other hand.
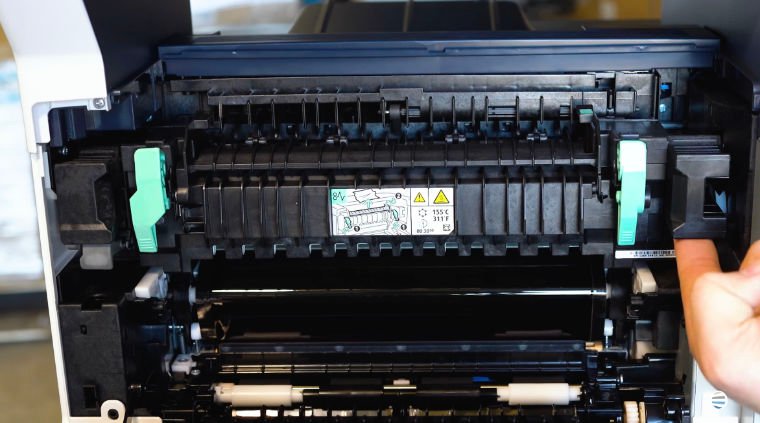
Use both hands so you have firm control of the fuser during removal.
Step 4: Release and Remove the Old Fuser
Grip the fuser firmly with both hands.
Squeeze the gray release button and pull the fuser straight out of the printer.
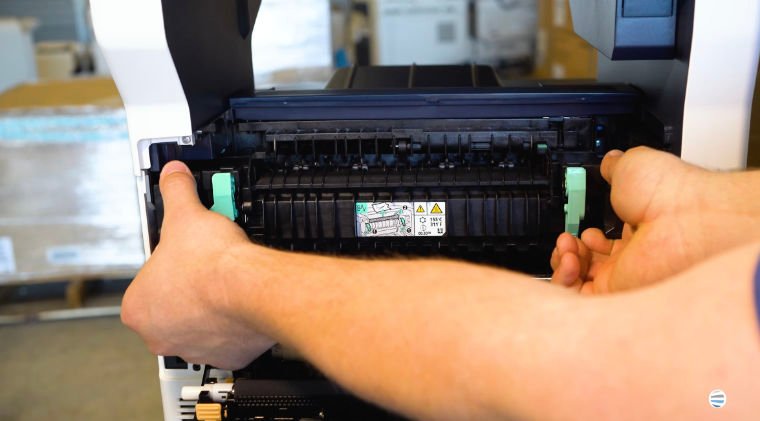
Avoid twisting the assembly as you remove it. A smooth, straight motion gives you better control and reduces the chance of damaging surrounding parts.
Remember that the fuser can remain hot after printing, so do not touch the heated areas directly.
Step 5: Align the New Fuser
Before inserting the replacement, look at both sides of the fuser.
There are two guide dowels on each side that help position the component correctly. These dowels fit into corresponding slots on the sides of the printer frame.
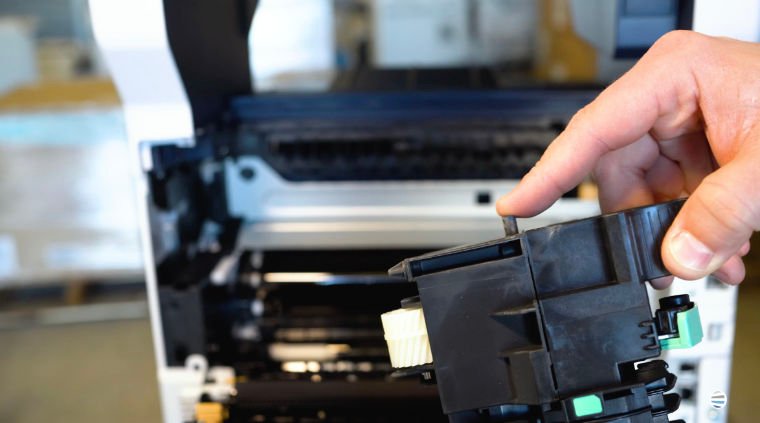
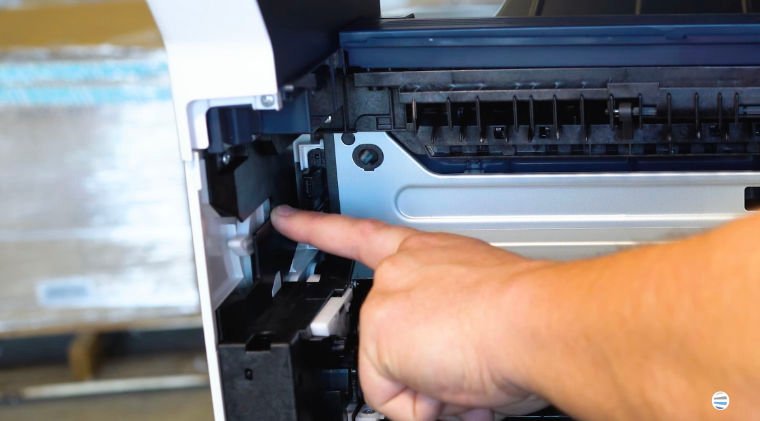
Hold the new fuser by the handles in the same orientation as the one you removed and line the dowels up with the slots.
Correct alignment allows the fuser to move straight into position.
Step 6: Push the New Fuser Firmly Into Place
Once the guides are aligned, push the new fuser straight into the printer.
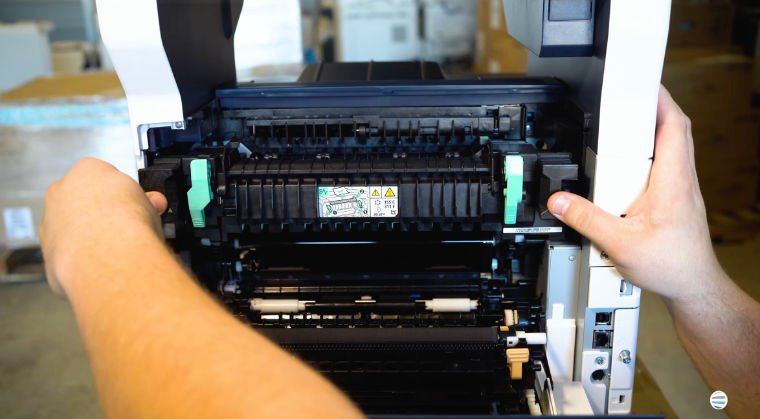
Use firm, even pressure until the assembly is fully seated and locks into place.
If the fuser does not move in smoothly, stop and check the guide dowels rather than forcing it at an angle.
Step 7: Close the Rear Cover
After confirming that the fuser is fully installed, close the rear cover.
Make sure the cover shuts completely before moving on.
Step 8: Restart the Printer
Turn the Xerox VersaLink C400 or C405 back on.
The printer should recognize the replacement fuser during startup and return to normal operation.
Common Fuser Replacement Mistakes to Avoid
Replacing the Fuser While the Printer Is Powered On
This is one of the most important mistakes to avoid. On the Xerox VersaLink C400 and C405, replacing the fuser without first powering down the machine can result in a 010 error.
Handling a Hot Fuser
The fuser operates at a high temperature. If the printer has been running, allow the component to cool before removing it.
Pulling the Fuser Out With One Hand
Use both hands and the designated grips. The fuser is easier to control when it is properly supported.
Misaligning the Guide Dowels
The dowels on the replacement fuser must line up with the slots in the printer frame. If they are not aligned, the fuser may not seat correctly.
Failing to Push the Fuser in Completely
The replacement should be pushed firmly into place until it locks. A partially seated fuser can lead to errors or printing problems.
Quick Recap
- Power down the printer.
- Allow the fuser to cool if necessary.
- Open the rear cover.
- Locate the gray release button and hand grips.
- Squeeze the release and pull the old fuser straight out.
- Align the new fuser’s guide dowels with the printer slots.
- Push the replacement firmly into place.
- Close the rear cover.
- Restart the printer.
FAQ
What does the fuser do in a Xerox VersaLink C400 or C405?
The fuser uses heat and pressure to bond toner permanently to the paper after the image is created.
Why do I need to turn off the printer before replacing the fuser?
Replacing the fuser while the printer is powered on can trigger a 010 error. Powering down also makes the replacement safer.
Can the fuser be hot when I remove it?
Yes. Fusers operate at high temperatures and can remain hot after printing. Allow the printer to cool before handling the component.
Where is the fuser located?
The fuser is located behind the rear cover of the Xerox VersaLink C400 and C405 and can be identified by its green handles.
How do I know the new fuser is installed correctly?
The guide dowels should align with the printer frame, and the fuser should push fully into place and lock securely.
Can I replace the fuser myself?
Yes. The fuser is accessible from the rear of the printer, and the replacement process can be completed by following the proper shutdown, handling, and installation steps.
Replacing the Fuser Correctly Helps Protect Print Quality
The fuser has one of the most important jobs in the printing process because it permanently bonds toner to the page. If the fuser is worn, incorrectly installed, or not fully seated, you may continue seeing print defects or error messages.
The biggest things to remember are to power the printer down first, allow the fuser to cool, handle it securely with both hands, and line up the guide dowels before pushing the replacement into place. Taking a few extra moments to install it correctly can help you avoid unnecessary errors and get your Xerox VersaLink back to reliable printing.
For more practical Xerox repair tutorials and printer maintenance tips, subscribe to The Printing Workshop on YouTube.
You will get access to more quick, step-by-step videos from experienced printer technicians like Matthew
