 Skip to main content
We understand that printer issues can be a major headache, especially when they disrupt your workflow and productivity. One common problem that many users encounter is a worn-out fuser. If you’re experiencing poor print quality, frequent paper jams, or error messages related to the fuser, it might be time for a replacement.
Why and When to Replace Your Fuser
The fuser is a crucial component in your printer that helps to bond the toner to the paper. Over time, the fuser can wear out due to the high temperatures and pressure it operates under. Signs that your fuser needs replacing include:
- Streaks or smudges on printed pages: These occur when the toner isn’t properly fused to the paper.
- Frequent paper jams: A faulty fuser can cause paper to get stuck as it passes through the printer.
- Error messages: Your printer may alert you to issues with the fuser through error codes or maintenance alerts.
At Strategic Technology Partners of Texas (STPT), we specialize in printer repairs and maintenance. With 35+ years of experience and having serviced thousands of printers, we’ve encountered and resolved just about every issue imaginable, including fuser replacements.
In this blog, we’ll walk you through the steps to replace the fuser in your Xerox AltaLink B8100 or C8100 Series model, ensuring your printer runs smoothly again.
Matthew, one of our seasoned printer technicians, will guide you through the fuser replacement process. With several years of experience in printer repairs, he’ll show you how to get your printer back in working order in no time.
Note: This guide can be used for all models in the AltaLink C8100 & B8100 Series.
Before starting, power off your machine and allow it to cool. The fuser becomes very hot, so handle it only after it has cooled down.
Step 1: Open the Left Side Cover (A)
First, locate the left side cover of your Xerox AltaLink C8170, labeled as cover A. Use the gray handle to open this cover. Inside, you will find the fuser unit, typically referred to as the R8.

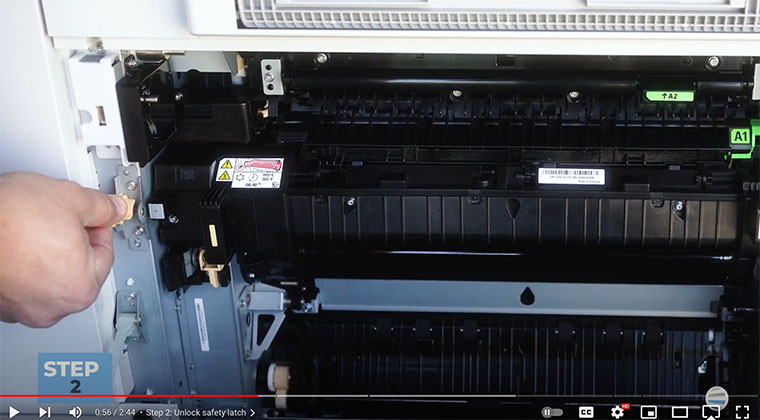
Step 2: Unlock the Safety Latch
Once you’ve opened the side cover, you’ll notice an orange safety latch on the fuser.

Lift this latch up and slide the pin back. This step is crucial as it secures the fuser in place and prevents it from being accidentally removed or inserted incorrectly.
Step 3: Squeeze the Orange Handles
On the bottom of the fuser, there are two orange handles on each side.

Lift both handles up and squeeze them together to release the pins that hold the fuser in place.

Step 4: Remove the Fuser
With the pins released, grab the fuser by the two black handles with the orange stickers. Then, pull the fuser straight out of the machine. It should come out smoothly if the pins are fully disengaged.

Step 5: Insert the New Fuser
Grab your new fuser with the same handles that have orange stickers. Ensure that the green A1 sticker on the fuser is facing up.

Align the fuser with the metal shelves inside the machine.

Gently set it in place and slide it in. It should fit smoothly, though you might need to apply a slight push to ensure the pins are fully engaged. Don’t use strong force.

Step 6: Lock the Safety Latch
After the new fuser is in place, return to the orange safety latch. Slide the latch to the right and swing it down into its locked position. This secures the fuser and ensures it’s held firmly in place during operation.

Step 7: Close the Left Side Cover (A)
Finally, close the left-side cover, making sure it snaps shut securely. With the cover closed, power up your machine. With your new fuser installed correctly, your printer is ready to run again.
The Importance of Replacing Your Fuser
Replacing the fuser in a Xerox AltaLink C8170 is a manageable task if you follow these steps carefully. Check your printer often to see messages related to your fuser. By replacing your fuser on time, you’ll ensure your printer remains reliable and avoid costly work interruptions.
Remember to handle the components gently and ensure all latches and covers are securely in place. By doing so, you’ll maintain your printer in good working order and extend its operational life.
If you’d like to know more about printer longevity, check out our blog on 8 Tips to Increase the Lifespan of Your Printer/Copier.
Ready for More Tips?
To keep up with more useful tips and tutorials on printer maintenance, subscribe to our YouTube channel, The Printing Workshop. By subscribing, you’ll have access to a wealth of knowledge from experienced technicians like Matthew, helping you tackle any printer issue with confidence.
Proper maintenance and timely replacements are key to keeping your office equipment running smoothly and efficiently.
If you encounter any difficulties or have a more complex printer issue, contact us. Our trained printer technicians will work to assist you.
