 Skip to main content

If your Xerox AltaLink B8100/C8100 Series copier is displaying a "Replace Drum" message or you're starting to notice streaks, faded prints, or a decline in image quality, it may be time to replace one of the drum units. While replacing a drum might sound like a job for a technician, Xerox designed the process so users can complete it themselves with just a few careful steps.
The drum is one of the most important imaging components inside your copier. It works with the toner to transfer text and images onto the page. Because the drum experiences wear with every print, it eventually reaches the end of its service life. When that happens, the copier will notify you that it's time for a replacement to help maintain consistent print quality.
At Strategic Technology Partners of Texas (STPT), we've serviced thousands of Xerox printers and copiers across North Texas for more than 40 years. Our technicians have replaced drum units thousands of times, helping businesses keep their equipment running reliably while avoiding unnecessary downtime.
In this guide, Matthew from The Printing Workshop will show you exactly how to replace a drum on a Xerox AltaLink B8100/C8100 Series copier. Along the way, you'll learn how to remove the old drum safely, install the new one correctly, avoid damaging the imaging surface, and get your copier back to producing high-quality prints.
Table of Contents
- What Is a Drum?
- When Should You Replace a Drum?
- How to Replace a Drum on a Xerox AltaLink B8100
- Common Drum Replacement Mistakes
- Short Recap
- FAQ
Short Answer: Drum Replacement on Xerox AltaLink C8100/B8100
To replace a drum on a Xerox AltaLink B8100 or C8100 Series copier, open the front cover, remove the waste toner transport assembly, unlock the developer assembly, remove the old drum, install the replacement drum, reassemble the copier, and close the front cover.
What Is a Drum?
A drum is an imaging component that transfers toner onto paper during the printing process. While the toner cartridge supplies the toner, the drum helps create the images and text that appear on each page.
Every time you print, the drum is exposed to wear. Over time, that wear can affect print quality, which is why Xerox considers the drum a replaceable maintenance item.
When Should You Replace a Drum?
You should replace the drum when your Xerox AltaLink B8100/C8100 displays a drum replacement message or when print quality begins to decline.
Common signs include:
- Repeating marks on pages
- Streaks or lines
- Faded images or text
- Uneven print quality
- A "Replace Drum" notification
The copier continuously monitors drum life and alerts you when the component reaches the end of its expected service life. Replacing it promptly helps maintain image quality and keeps the copier operating reliably.
How Do You Replace a Drum on a Xerox AltaLink B8100/C8100?
Replacing the drum only takes a few minutes when you follow the correct procedure.
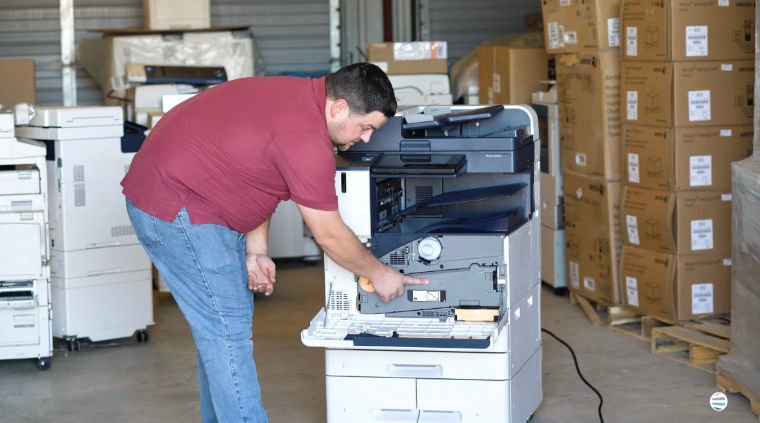
Step 1: Open the Front Cover
Begin by opening the copier's front cover.
This gives you access to the internal maintenance components you'll need to remove before replacing the drum.
Step 2: Remove the Waste Toner Transport Assembly
Locate the waste toner transport assembly at the front of the machine.
Unlock the assembly by pressing the release tabs on each side, and pull it straight out.
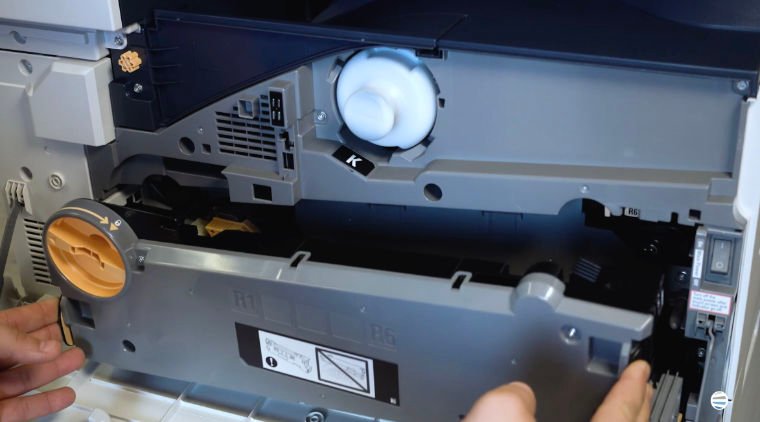
Set the assembly aside somewhere clean while you replace the drum.
Step 3: Unlock the Developer Assembly
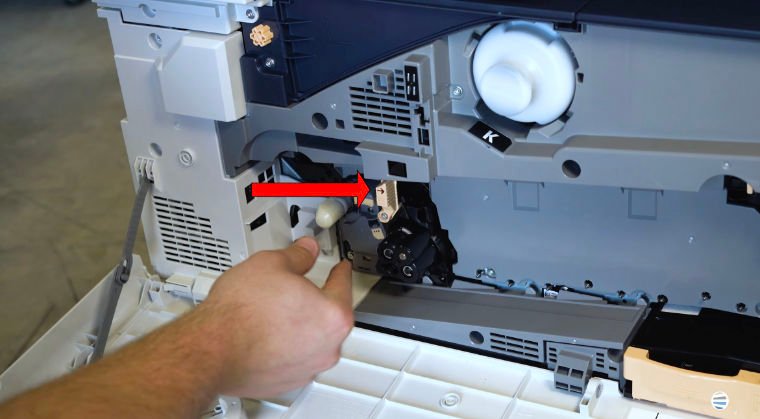
Behind the waste toner transport assembly, you'll find the developer assembly.
Locate the latch labeled R1, R2, R3, or R4, depending on which drum you're replacing.
Lift the latch upward to unlock the assembly.
Step 4: Remove the Drum
Press the orange release button located on the end of the drum and carefully pull the drum straight out.
Support the drum from underneath while removing it. Place one hand under the middle of the drum and use your thumb against the black plastic side to keep a secure grip as it slides out.
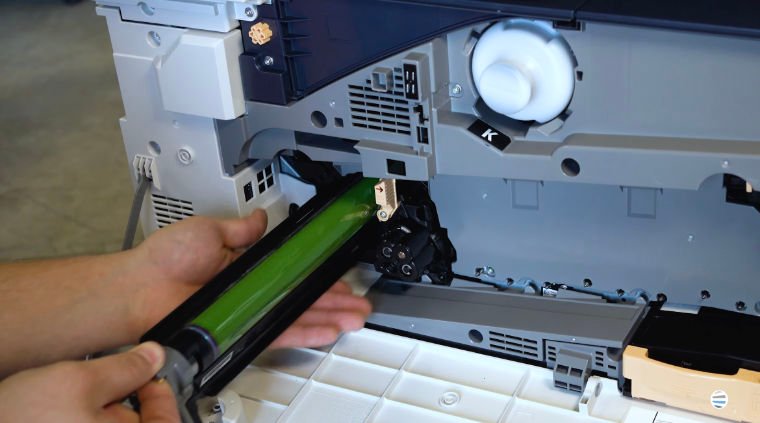
Most importantly, avoid touching the green imaging surface.
Fingerprints, scratches, or other damage to this surface can negatively affect print quality. Handle the drum only by the plastic housing whenever possible.
Step 5: Install the New Drum
Take the replacement drum and locate the guide on the top.
This guide fits into a matching slot inside the copier.
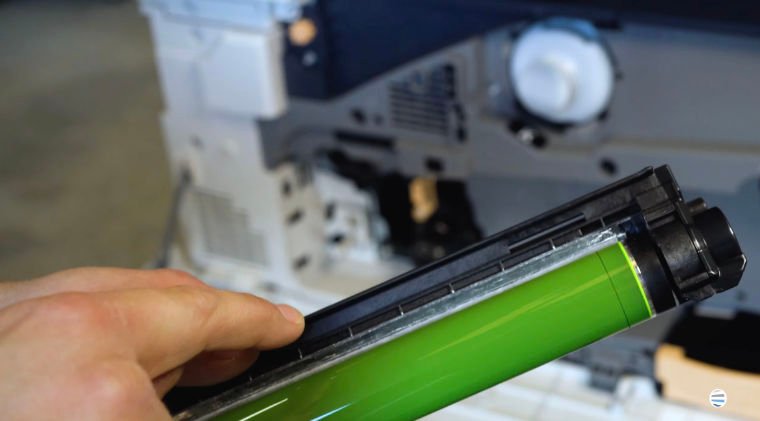
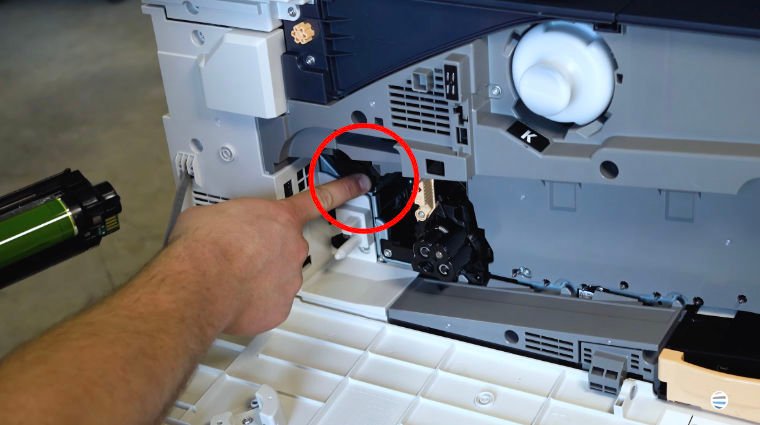
Once the guide is aligned, carefully slide the drum straight into place until it is fully seated.
If the drum doesn't move smoothly, don't force it. Remove it, verify the alignment, and try again.
Step 6: Lock the Developer Assembly
After the drum is fully installed, lower the developer assembly latch back into position.
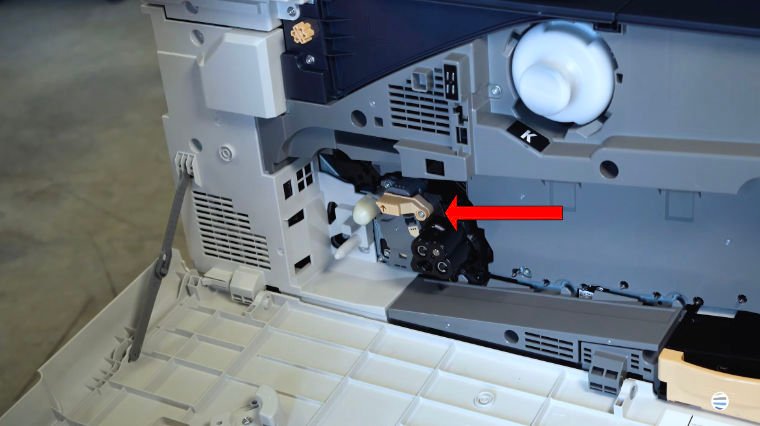
This secures the drum and prepares the copier for normal operation.
Step 7: Reinstall the Waste Toner Transport Assembly
Take the waste toner transport assembly and insert it back into the copier.
Matthew recommends pressing evenly on both sides using both thumbs until each side clicks securely into place.
Once it's fully seated, relock the assembly.
Step 8: Close the Front Cover
Close the front cover.
Your Xerox AltaLink B8100/C8100 should recognize the new drum automatically, and you'll be ready to resume printing.
Common Drum Replacement Mistakes
Although replacing the drum is straightforward, avoiding a few common mistakes can help prevent print quality issues.
Touching the Green Drum Surface
The green imaging surface is extremely sensitive. Touching or scratching it can lead to streaks, spots, or other print defects that can’t be fixed.
Forgetting to Lock the Developer Assembly
Always lower the latch after installing the new drum. An unlocked developer assembly can prevent the copier from operating properly.
Misaligning the Drum
Use the guide on top of the drum to align it with the slot inside the copier. If the drum doesn't slide in easily, check the alignment instead of forcing it.
Not Seating the Waste Toner Transport Assembly Completely
When reinstalling the assembly, press evenly until both sides click into place before locking it.
Short Recap
- Open the front cover.
- Remove the waste toner transport assembly.
- Unlock the developer assembly.
- Press the orange release button and remove the old drum.
- Install the new drum using the alignment guide.
- Lock the developer assembly.
- Reinstall and lock the waste toner transport assembly.
- Close the front cover.
FAQ
What does a drum do in a Xerox AltaLink B8100/C8100?
The drum transfers toner onto paper and creates the images and text that appear on printed pages.
How do I know when my drum needs to be replaced?
The copier will display a replacement message when the drum reaches the end of its expected service life.
Can I replace the drum myself?
Yes. Xerox designed the drum as a customer-replaceable component, and most users can replace it in just a few minutes.
Can I touch the green surface on the drum?
No. Touching the green imaging surface can damage the drum and reduce print quality.
What happens if the drum isn't installed correctly?
An improperly installed drum can lead to print quality issues or prevent the copier from operating normally.
Proper Drum Replacement Helps Maintain Print Quality
Replacing the drum correctly is one of the easiest ways to keep your Xerox AltaLink B8100/C8100 Series printer producing sharp, professional-quality documents. Replacing the drum when necessary can also help prevent print quality problems and unnecessary downtime.
At STPT, we've helped businesses maintain Xerox equipment for decades, and we've seen firsthand how proper maintenance extends the life of a copier and keeps offices productive.
Want More Xerox Maintenance Tutorials?
For more Xerox repair guides, troubleshooting tips, and step-by-step printer maintenance tutorials, subscribe to The Printing Workshop on YouTube.
Subscribe today to learn practical maintenance tips from experienced Xerox technicians and keep your printers and copiers running at their best.
