 Skip to main content
Are you curious about what a corotron assembly is and why it might need to be replaced? In Xerox printers, the corotron assembly is responsible for creating an electrical charge on top of the black drum. Whenever you replace the black drum, you're also replacing the corotron unit.
Typically, you won't need to replace the corotron assembly very often. However, if it becomes dirty, your print quality may suffer, and you'll need to replace it.
This tutorial will guide you through the process of replacing a corotron assembly step-by-step on the Xerox PrimeLink C9065. Please note that this guide also applies to the Xerox PrimeLink C9070, as well as the C60 and C70 models.
Step 1: Open the Front Cover
To begin the process, open the front white cover of your Xerox PrimeLink printer. Locate the handhold on the right side and pull it open.

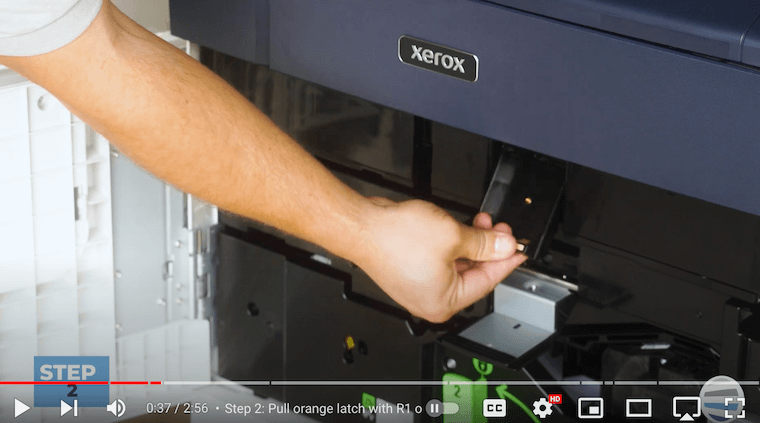
Step 2: Lower the Orange Latch with R1 on It & Raise the Upper Latch with the Thin Orange Line
Once the front cover is open, lower the latch labeled ‘R1-R4’ and raise the upper latch with a thin orange line. This action prepares the drum tray for the upcoming steps.
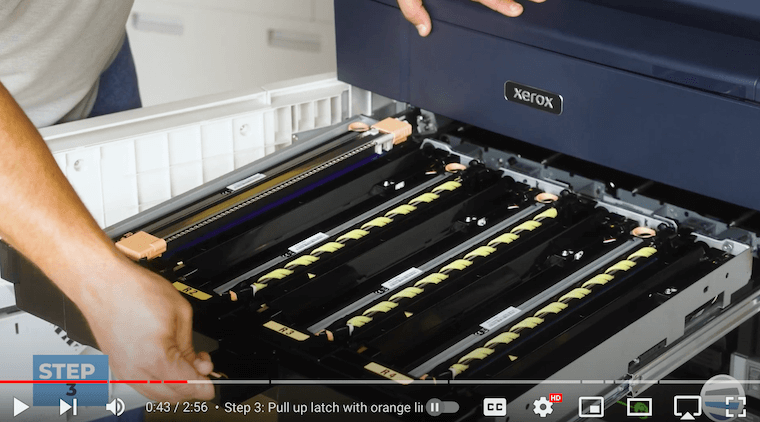
Step 3: Pull the Drawer All the Way Out
Now grab onto the upper latch with a thin orange line and pull the drum tray straight out. This exposes the charge corotron assembly (second picture below), which is a spiral-looking component on top of the black R1 drum.

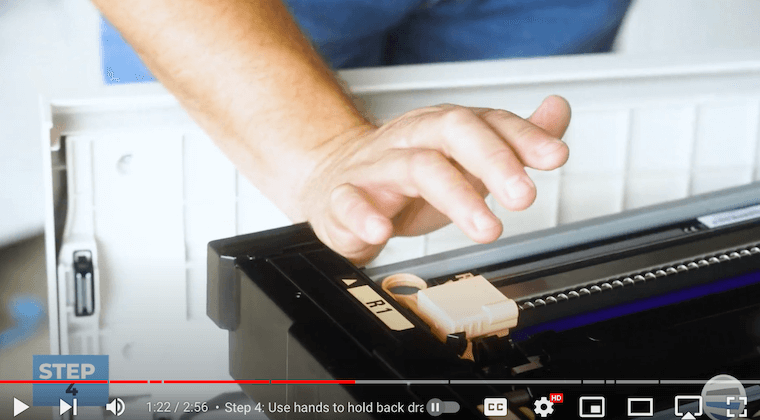
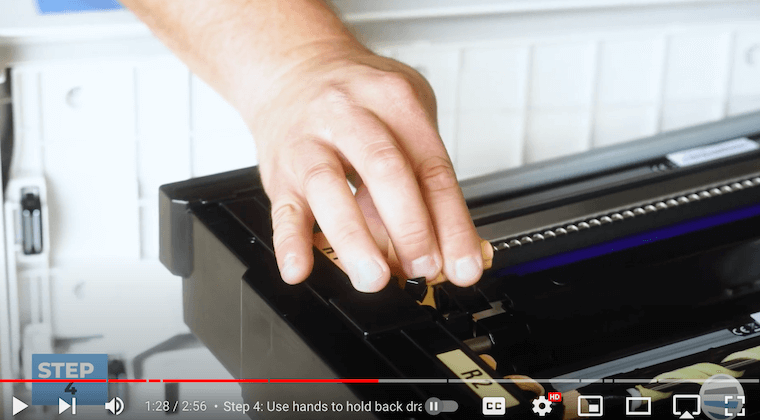
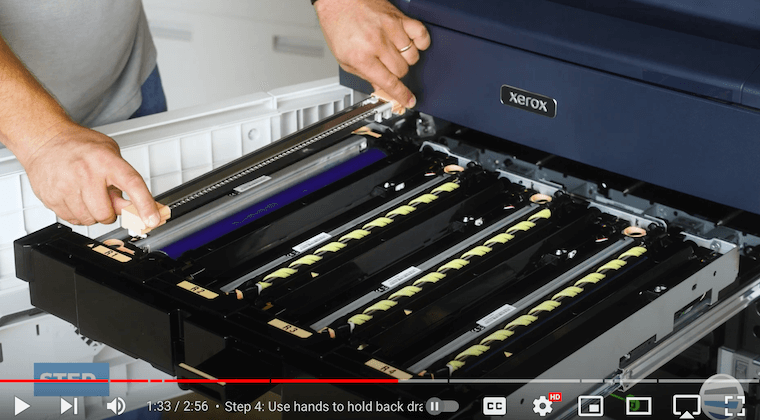
Step 4: Use Your Hands to Hold Back the Drawer and Pull the Orange Tabs Back to Release the Corotron Assembly
Use the palm of your hand (exemplified in the first picture below) to hold the drawer in place while you grab the two orange blocks on the sides of the charge corotron assembly (second picture below). These blocks have a texture for better grip. Slide the assembly straight back, ensuring the drawer is held in place to prevent it from closing.
Step 5: Remove the Corotron Assembly
Carefully remove the old charge corotron assembly by lifting it straight up.
Step 6: Insert New Corotron Assembly
Insert the new corotron assembly by dropping it in slightly to the rear, aligning it with the front orange block. If the rear block doesn't align, slide the assembly forward until it falls into place. Once in position, snap the assembly forward to lock it into place.
Note: Be careful with the fine wire mesh on the corotron assembly.

Step 7: Close Drawer
With the new corotron assembly securely in place, push the drum tray back into the machine. Ensure that it clicks into position.
Step 8: Close Top Latch & Bottom Latch with R1 on It
Secure the top latch (with the thin orange line). Then close the bottom latch labeled 'R1.' Note that even if it hangs out slightly, it is considered closed.
Step 9: Close Front Cover
Finally, close the front cover of the printer to complete the corotron assembly replacement process.
Corotron Assembly Replacement for your Xerox PrimeLink C9065 Made Easy
Replacing the corotron assembly on a Xerox PrimeLink C9065 may seem intimidating, but with Matthew’s clear instructions, you can confidently perform the task. If you care about the health of your Xerox printer and the quality of your prints, it’s crucial that you monitor customer-replaceable units and replace them when necessary.
If you’d like to know how to increase your printer’s longevity, consider our blog on 8 tips to increase the lifespan of your copier/printer.
Check out Even More Resources!
Found this guide useful? Explore our Learning Center for more informative how-to guides. Remember to subscribe to our YouTube channel, The Printing Workshop, to get notified when we upload more helpful printer videos.
If your printer needs the help of a specialist, please do not hesitate to contact us. Our experienced printer technicians are always available to help you troubleshoot and find a solution.
