 Skip to main content

A “Replace Waste Toner Container” message can stop you in the middle of a busy workday and leave you wondering whether this is a quick fix or something that requires a service call. The good news is that replacing the waste toner container on a Xerox AltaLink C8000 Series copier is a simple maintenance task when you know the correct steps.
The waste toner container collects excess toner that is removed during normal printing. Because that toner has to go somewhere, the container gradually fills over time. Once it reaches capacity, the copier will alert you that it needs to be replaced. Changing it promptly helps prevent toner from spilling inside the machine and keeps the copier ready for use.
At Strategic Technology Partners of Texas (STPT), we have serviced thousands of printers and copiers and handled waste toner replacements thousands of times. Our technicians work with Xerox devices every day, helping businesses keep their equipment running reliably and avoid unnecessary downtime.
In this guide, our printer technician Matthew will show you exactly how to replace the waste toner container on a Xerox AltaLink C8000 Series copier. The process is also the same for the Xerox AltaLink B8000 Series.
By the end of this article, you will know where the waste toner container is located, how to remove the old one without making a mess, how to install the replacement correctly, and how to get your copier back up and running.
Table of Contents
- What Is a Waste Toner Container?
- When Should You Replace the Waste Toner Container?
- How to Replace the Waste Toner Container
- Common Mistakes to Avoid
- Quick Recap
- FAQ
- Why Proper Replacement Matters
Short Answer: Waste Toner Container Replacement on Xerox AltaLink C8000/B8000 Series
To replace the waste toner container on a Xerox AltaLink C8000 or B8000 Series copier, open the front cover, prepare the plastic bag included with the new container, remove the old R5 container, place it directly into the bag, install the new container until it clicks, and close the front cover.
What Is a Waste Toner Container?
A waste toner container collects toner that is not transferred onto the page during printing.
During normal operation, the copier removes excess toner from its imaging system and directs it into the waste toner container. On the Xerox AltaLink C8000 Series, this component is identified as R5 and is located in the lower-right area behind the front cover.
The waste toner container is different from the regular toner cartridges. Toner cartridges supply toner for printing, while the waste toner container stores the excess toner the machine removes.
When Should You Replace the Waste Toner Container?
You should replace the waste toner container when your Xerox AltaLink displays a message telling you the container is full or needs replacement.
The copier tracks the condition of the waste toner system and will typically notify you before the container becomes a problem. Waiting too long can increase the chance of toner overflow or interrupt printing altogether.
- A full waste toner container may result in:
- A replacement message on the touchscreen
- A maintenance alert
- Printing stopping until the container is changed
Replacing it when prompted helps keep loose toner contained and allows the copier to continue operating normally.
How Do You Replace the Waste Toner Container on a Xerox AltaLink C8000 or B8000?
The replacement is simple: prepare the disposal bag first, remove the old R5 waste toner container, place it directly into the bag, and slide the replacement into the machine until it locks.
Step 1: Open the Front Cover
Begin by opening the copier’s front cover.
Look toward the lower-right corner to find the R5 waste toner container.
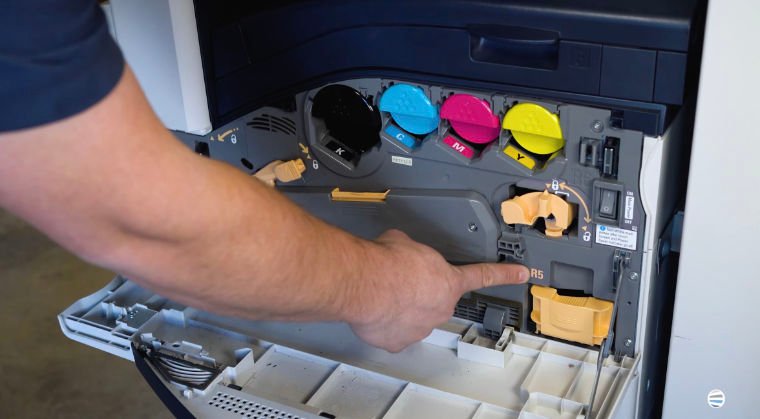
Before pulling it out, prepare the replacement container and disposal bag.
Step 2: Unbox the New Waste Toner Container
Open the box containing the replacement waste toner container.
Inside, you will also find a small plastic bag.
Do not throw that bag away. It is there to help you contain the old waste toner container and reduce the chance of loose toner getting everywhere.
Step 3: Prepare the Plastic Bag
Open the plastic bag fully. Have it ready before removing the old container so you can place the used unit directly inside.
This will help save you from a much bigger cleanup.
Step 4: Remove the Old Waste Toner Container
Grab the old R5 waste toner container and pull it straight out of the machine.
Avoid tipping or shaking it while you remove it because the container holds loose toner.
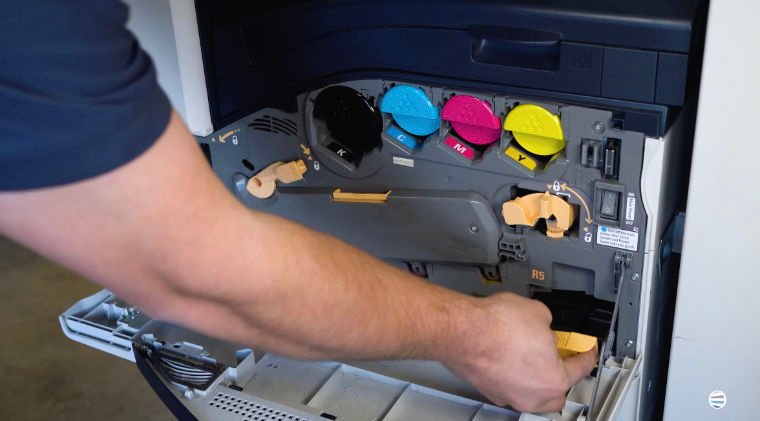
Step 5: Place the Old Container in the Bag
Slide the used waste toner container completely into the plastic bag you prepared.
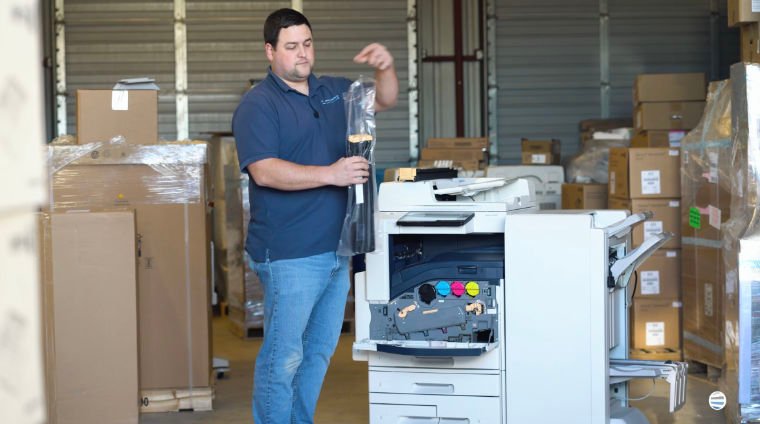
This helps contain any loose toner that may escape from the opening in the container.
Step 6: Install the New Waste Toner Container
Take the new waste toner container and align it with the opening in the copier.
Slide it straight in and push the container until you hear it click.
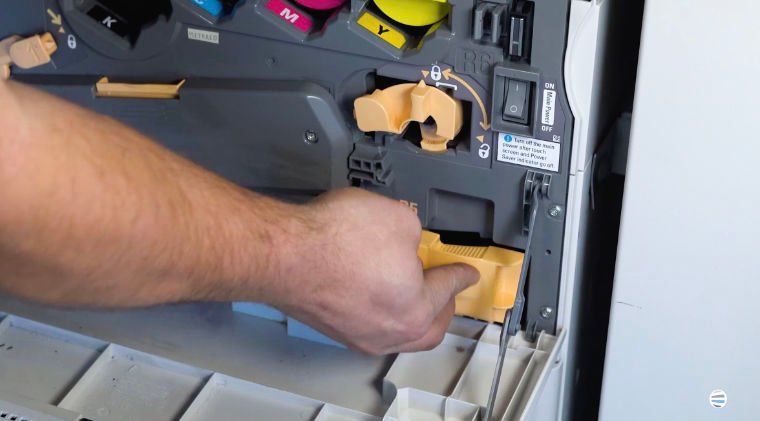
Step 7: Close the Front Cover
Close the front cover.
Your Xerox AltaLink should recognize the replacement container and return to normal operation.
The waste toner container replacement is now complete.
Common Waste Toner Container Replacement Mistakes to Avoid
Removing the Old Container Before Preparing the Bag
Have the disposal bag open and ready first. This makes it much easier to move the full container directly into the bag without carrying it around uncovered.
Tilting or Shaking the Old Container
The used container holds loose toner. Keep it level and steady as you pull it out to reduce the chance of spills.
Forgetting to Push the New Container Until It Clicks
The new waste toner container needs to be fully seated. If it is not locked into place, the copier may continue displaying a maintenance message.
Forcing the Replacement Into the Machine
The new container should slide in smoothly. If you feel resistance, check its orientation and alignment before pushing harder.
Quick Recap
- Open the front cover.
- Locate the R5 waste toner container.
- Unbox the replacement.
- Open the included plastic disposal bag.
- Pull the old container straight out.
- Place it directly into the bag.
- Slide the new container into the machine.
- Push until it clicks.
- Close the front cover.
FAQ
What does a waste toner container do?
A waste toner container stores excess toner removed from the copier during the printing process.
Where is the waste toner container on the Xerox AltaLink C8000?
The R5 waste toner container is located in the lower-right area behind the front cover.
Is the waste toner replacement process the same on the B8000 and C8000 Series?
Yes. The basic replacement process described in this guide applies to both the Xerox AltaLink B8000 and C8000 Series.
Why does the replacement come with a plastic bag?
The bag is designed to contain the used waste toner container and help prevent loose toner from spilling during disposal.
How do I know the new waste toner container is installed correctly?
Push the replacement container straight into the machine until you hear or feel it click securely into place.
Can a full waste toner container stop the copier from printing?
Yes. The copier may eventually stop printing until the full waste toner container is replaced.
Proper Waste Toner Replacement Helps Prevent Messes and Downtime
Replacing the waste toner container correctly helps keep loose toner contained inside the system and allows your Xerox AltaLink to continue operating without unnecessary interruptions.
The biggest things to remember are to prepare the disposal bag before removing the old container, keep the full container steady, and make sure the replacement clicks securely into place. Taking those few extra precautions can help you avoid a messy toner spill and get back to printing faster.
For more Xerox repair tutorials and printer maintenance tips, subscribe to The Printing Workshop on YouTube. You will get access to more quick, step-by-step guides from experienced technicians like Matthew.
