 Skip to main content

If you’re dealing with declining print quality or a copier that won’t operate normally until the second bias transfer roll is changed, this guide is for you.
The second bias transfer roll helps transfer the toner image onto the paper as each sheet moves through the copier. Because the roll makes contact with paper throughout the printing process, it gradually wears down. Your Xerox AltaLink will typically track its remaining life and notify you when replacement is needed.
At Strategic Technology Partners of Texas, our technicians work with Xerox equipment every day, helping businesses maintain print quality and avoid unnecessary downtime.
In this guide, our printer technician Matthew will show you how to replace the second bias transfer roll on a Xerox AltaLink C8000 Series copier. The replacement process is also the same for the Xerox AltaLink B8000 Series.
By the end of this article, you will know where the second bias transfer roll is located, how to remove the old roll, how to align and install the replacement, and how to close the side door correctly so the copier can return to normal operation.
Table of Contents
- What Is a Second Bias Transfer Roll?
- When Should You Replace the Second Bias Transfer Roll?
- How to Replace the Second Bias Transfer Roll
- Common Replacement Mistakes to Avoid
- Quick Recap
- FAQ
- Why Correct Installation Matters
Short Answer: Second Bias Transfer Roll Replacement on Xerox AltaLink C8000/B8000 Series
To replace the second bias transfer roll on a Xerox AltaLink C8000 or B8000 Series copier, open the left-side door, release the orange locking tab, lift out the old roll, align the new roll with the metal contact slots, press it down until it clicks, and close both door latches securely.
What Is a Second Bias Transfer Roll?
The second bias transfer roll, sometimes shortened to second BTR, is a component that helps move the toner image from the copier’s transfer system onto the paper.
As each sheet passes through the machine, the second bias transfer roll applies the electrical charge and pressure needed for the toner image to transfer properly. Its condition can therefore affect how consistently toner reaches the page.
The second bias transfer roll is a replaceable maintenance component. It is not the same as a toner cartridge or drum, although all three parts contribute to the final printed image.
When Should You Replace the Second Bias Transfer Roll?
You should replace the second bias transfer roll when your Xerox AltaLink displays a maintenance message indicating that the component has reached the end of its expected service life.
The copier monitors the roll as it wears through normal use. Depending on its condition, a worn transfer roll may contribute to print-quality or paper-transfer problems.
Possible signs include:
- A second bias transfer roll replacement message
- Uneven or incomplete toner transfer
- Marks or defects appearing on printed pages
- Printing problems after the component reaches its expected life
It is best to replace the roll when the copier prompts you rather than continuing to print with a worn component. Timely replacement helps maintain consistent toner transfer and reduces the chance of avoidable interruptions.
How Do You Replace the Second Bias Transfer Roll on a Xerox AltaLink C8000 or B8000 Series?
To replace the second bias transfer roll, open the left-side door, unlock and remove the old roll, install the replacement in the metal contact slots, and close both the front and rear door latches.
Step 1: Open the Left-Side Door
Begin by opening the copier’s left-side door.
The second bias transfer roll is mounted near the top of the door, so you do not need to remove any other assemblies before accessing it.
Take a moment to identify the orange release tab and the plastic section at the top of the roll.
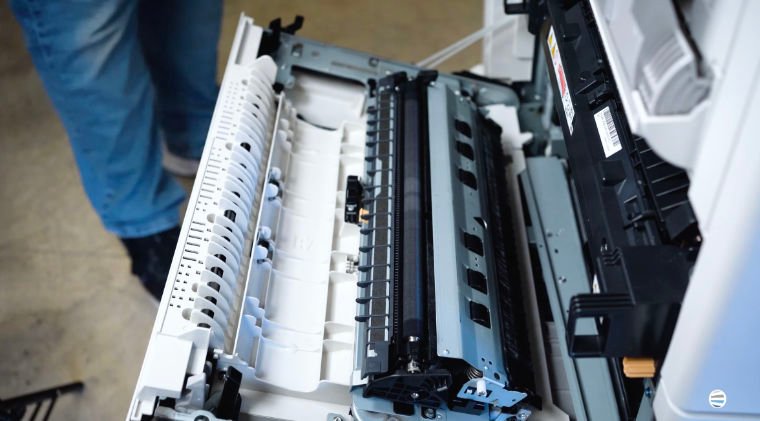
Step 2: Release the Orange Locking Tab
Locate the orange tab on top of the second bias transfer roll.
An arrow on the tab shows the direction in which it should move. Press the tab firmly in the direction of the arrow until you hear it click.
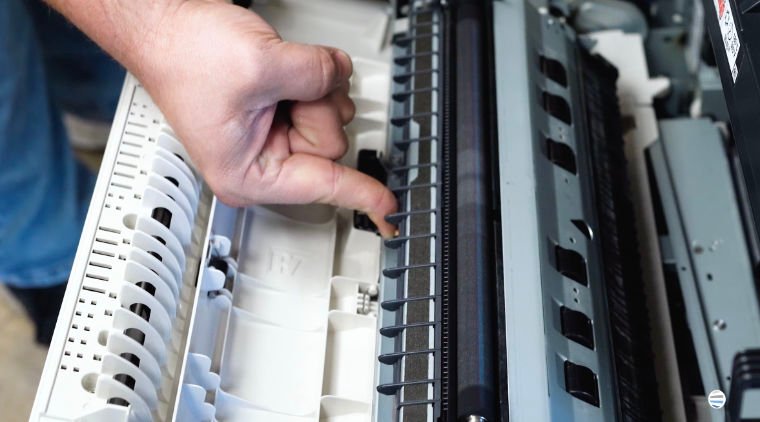
The tab may require a little pressure. Once you hear the click, it confirms that the roll has been released and is ready for removal.
Step 3: Remove the Old Second Bias Transfer Roll
Grip the roll by the plastic section at the top.
Swing the plastic upward, then lift the entire transfer roll straight up and out of the door.
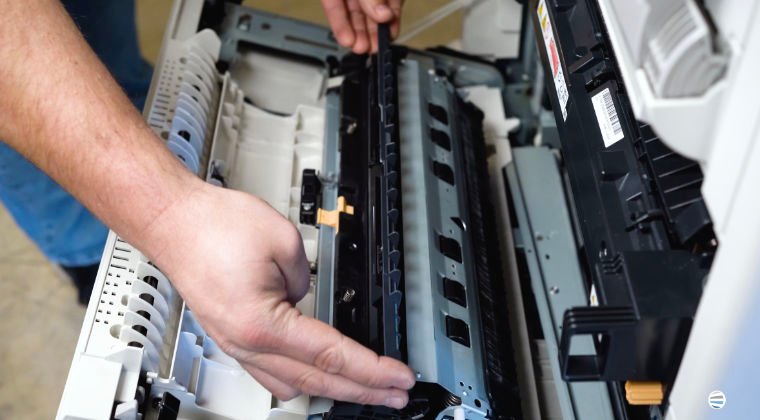
Avoid grabbing or pressing against the roller surface itself. Handling the component by its plastic housing gives you better control and helps protect the working surface.
Step 4: Unbox the New Transfer Roll
Open the replacement box and remove the new second bias transfer roll from its packaging.
Keep the new roll oriented with the plastic section facing upward. It will be installed in the same position and direction as the roll you removed.
Step 5: Align the Metal Wheels with the Slots
Look at both ends of the replacement roll. You will see small metal wheels that fit into corresponding slots on the copier door.
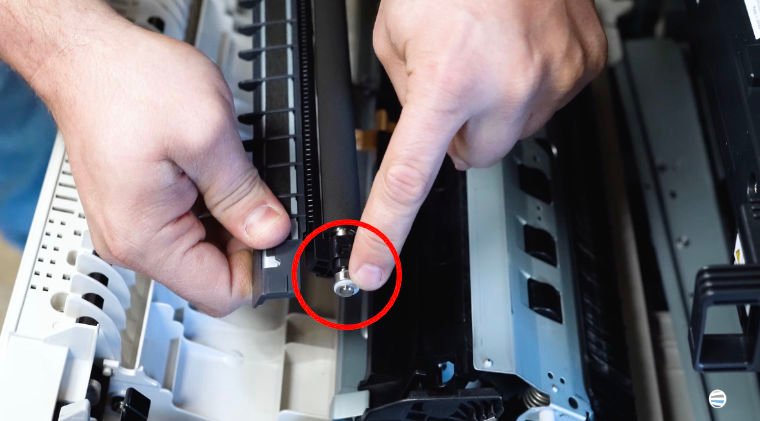
Each slot has a metal contact at the bottom. These contacts help you identify where the wheels should sit.
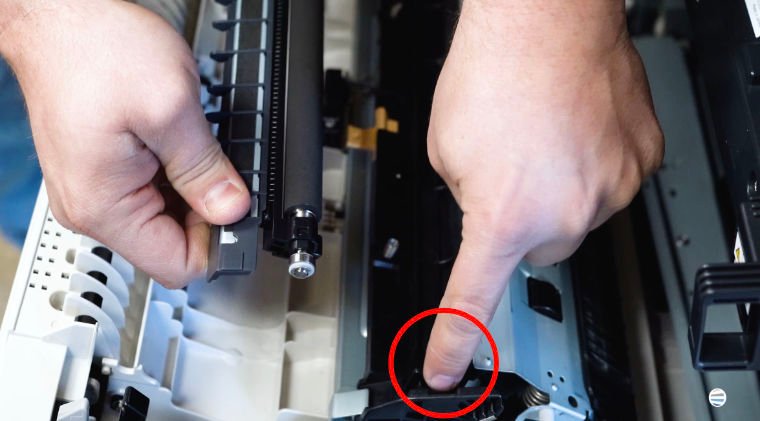
Hold the roll with the plastic section facing upward, then lower both metal wheels straight down into their slots.
Make sure both sides are aligned before continuing. If one side is not seated correctly, the roll may not lock into place.
Step 6: Lock the New Transfer Roll Into Place
Once the metal wheels are resting in their slots, swing the plastic section downwards.
Press down firmly on the plastic until you hear it click.
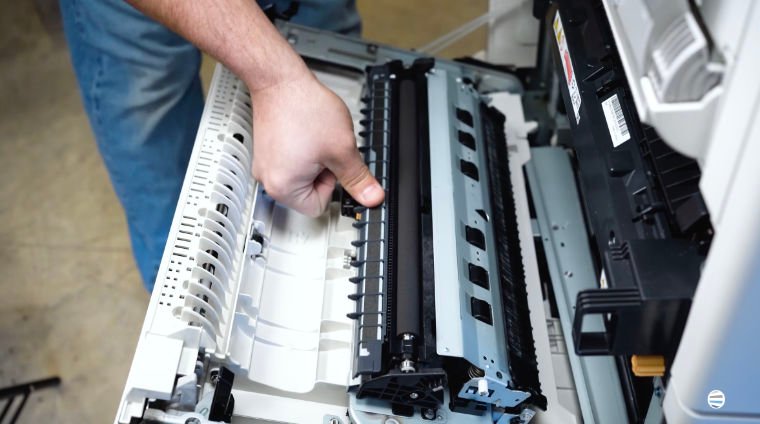
The click confirms that the second bias transfer roll is locked into position. The component should feel secure and should not move freely once installed.
Step 7: Close the Left-Side Door Correctly
The door has both a front latch and a rear latch. If you press only on the front, the front latch may close while the rear remains open. That incomplete closure can lead to printing problems.
Press firmly on both the front and rear of the door. Confirm that both sides latch before you resume printing.
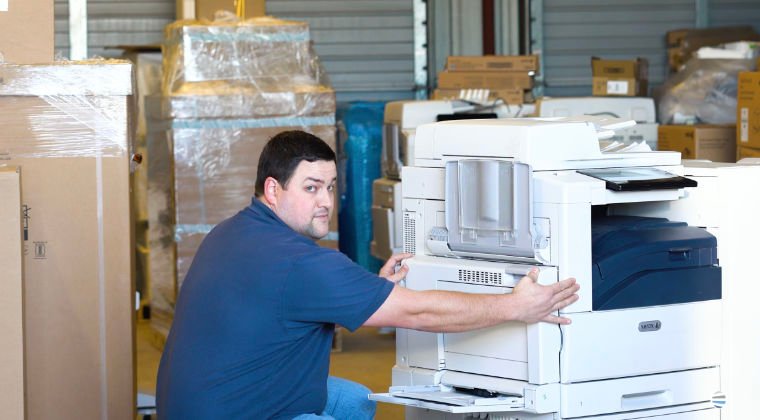
Your second bias transfer roll replacement is now complete.
Common Second Bias Transfer Roll Replacement Mistakes
Not Pressing the Release Tab Far Enough
The orange tab must move in the direction of the arrow until it clicks. If the roll does not lift out easily, check that the locking tab has fully released.
Pulling on the Roller Surface
Handle the component by the plastic section rather than the roller. This gives you better control and helps avoid contamination or damage.
Misaligning the Metal Wheels
Both metal wheels must sit inside their corresponding slots and make contact with the metal connection points.
Failing to Lock the New Roll
After placing the roll in the slots, swing the plastic toward the door and press until it clicks. Do not assume the component is secured simply because it is resting in position.
Closing Only the Front Door Latch
Press both the front and rear of the left-side door. Closing only one latch can cause door or printing issues.
Quick Recap
- Open the left-side door.
- Locate the second bias transfer roll.
- Press the orange tab in the direction of the arrow until it clicks.
- Lift the plastic section and remove the old roll.
- Unbox the replacement and keep the plastic section facing upward.
- Lower both metal wheels into their contact slots.
- Swing the plastic toward the door and press until it clicks.
- Close both the front and rear side-door latches.
FAQ
What does the second bias transfer roll do?
The second bias transfer roll helps transfer the toner image onto the paper as each sheet moves through the copier.
When should I replace the second bias transfer roll?
Replace it when your Xerox AltaLink displays a maintenance or replacement message indicating that the roll has reached the end of its expected life.
Is the process the same on the Xerox AltaLink B8000 and C8000 Series?
Yes. The second bias transfer roll replacement process described in this guide applies to both the Xerox AltaLink B8000 and C8000 Series.
Where is the second bias transfer roll located?
The component is mounted near the top of the copier’s left-side door.
How do I know the new roll is installed correctly?
The metal wheels should sit in their slots, and the plastic locking section should click securely into place.
Why must I press both sides of the door?
The left-side door has front and rear latches. Pressing both areas ensures that the entire door closes properly and helps prevent printing issues.
Correct Transfer Roll Replacement Supports Reliable Printing
Replacing the second bias transfer roll correctly helps your Xerox AltaLink transfer toner consistently and operate without avoidable door or component errors.
Take time to align both metal wheels with their slots, press the new roll until it locks, and confirm that both latches on the left-side door are closed. These small details can make the difference between a successful replacement and continued printing problems.
For more Xerox repair tutorials and practical maintenance guidance, subscribe to The Printing Workshop on YouTube. You will get access to more step-by-step videos and printer maintenance tips from experienced technicians.
