 Skip to main content
If your Xerox AltaLink B8200 Series copier is displaying a "Replace Drum" message or your print quality has started to decline, you may be wondering whether replacing the drum is something you can do yourself. The answer is yes. However, it's important to do it carefully.
Unlike toner replacement, a drum is a more critical imaging component inside your copier. Improper handling can affect print quality or even damage the new drum. That's why following the correct procedure matters.
At Strategic Technology Partners of Texas (STPT), we've serviced thousands of Xerox printers and copiers throughout North Texas over the last 40+ years. Drum replacements are a routine part of maintaining production and office devices, and our technicians have performed this procedure countless times.
In this guide, our expert technician Matthew from The Printing Workshop will walk you through exactly how to replace a drum on a Xerox AltaLink B8200 Series copier.
By the end of this article, you'll know what a drum does, when a drum needs replacement, how to replace a drum, and common mistakes during installation.
Table of Contents
- What Is a Drum in a Xerox Copier?
- When Does a Drum Need to Be Replaced?
- How to Replace a Drum on a Xerox AltaLink B8200
- Common Drum Replacement Mistakes to Avoid
- Quick Recap
- FAQ
What Is a Drum in a Xerox Copier?
A drum is an imaging component that transfers toner onto paper during the printing process. Without a functioning drum, your copier cannot produce clear, high-quality prints.
The drum works together with the toner cartridge to create the images and text you see on the page. While toner supplies the powder used to create the image, the drum helps transfer that image accurately onto paper.
Because the drum experiences wear over time, it is considered a replaceable maintenance item.
When Does a Drum Need to Be Replaced?
You should replace the drum when the copier displays a drum replacement message or when Xerox's recommended drum life has been reached.
In some cases, you may also notice print quality issues such as:
- Repeating marks on pages
- Streaks or lines
- Gray background shading
- Faded images
- Reduced image sharpness
Most AltaLink B8200 devices monitor drum life and will notify you when the drum is approaching the end of its life.
By replacing the drum on your printer, you can restore normal imaging performance.
How Do You Replace a Drum on a Xerox AltaLink B8200?
To replace a drum on a Xerox AltaLink B8200, open the front cover, remove the waste toner transport assembly, unlock the developer assembly, remove the old drum, install the new drum, and reassemble the machine.
Below is the complete step-by-step process.
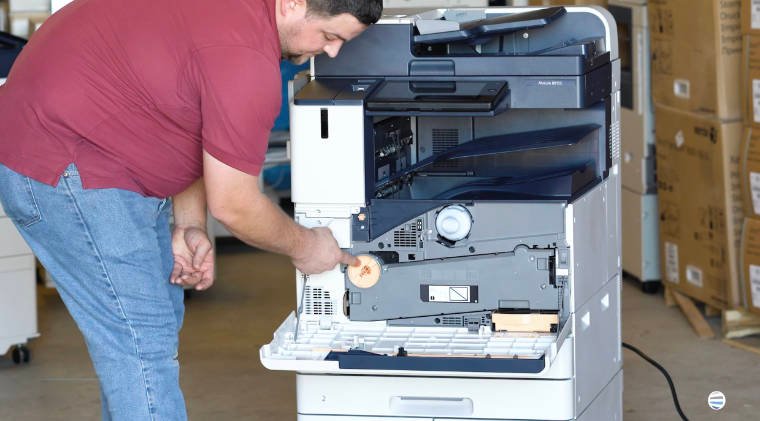
Step 1: Open the Front Cover
Start by opening the copier's front cover.
This gives you access to the internal assemblies needed for drum replacement.
Take a moment to identify the waste toner transport assembly.
Step 2: Remove the Waste Toner Transport Assembly
Locate the waste toner transport assembly, which is the front assembly positioned inside the machine.
To remove it:
- Unlock it by turning the orange handle counter-clockwise.
- Depress the tabs on both sides.
- Pull the assembly straight out.
- Set it aside carefully.
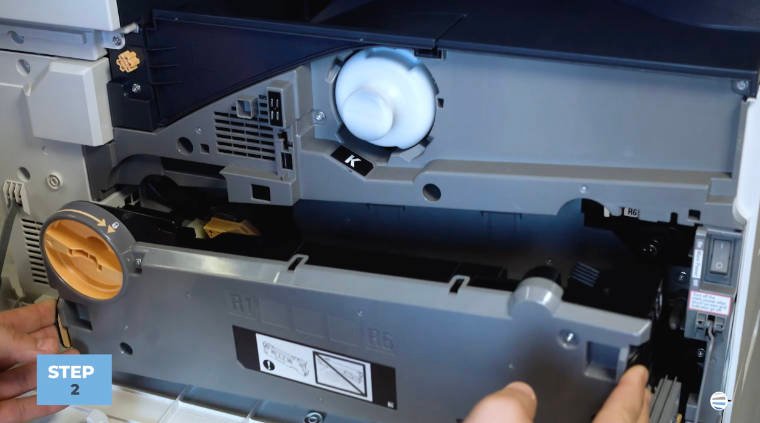
This will expose the developer assembly behind it.
Expert tip: Set the assembly somewhere clean and secure so it doesn't get damaged while you complete the drum replacement.
Step 3: Unlock the Developer Assembly Latch
Next, locate the developer assembly latch.
You'll see markings labeled R1, R2, R3, and R4.
Lift the latch upward to unlock the developer assembly and prepare it for drum removal.
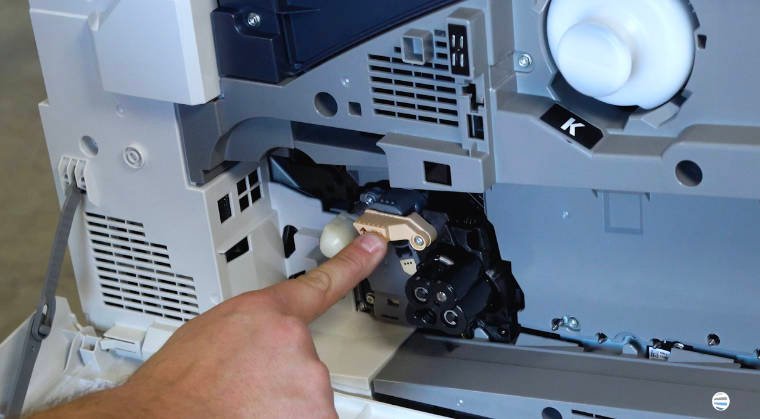
Step 4: Press the Orange Release Button and Remove the Drum
Locate the orange release button on the end of the drum assembly.
Press the button and carefully pull the drum straight out.
Important: Do Not Touch the Green Drum Surface. The green surface on the drum is extremely sensitive. Touching it with your fingers can leave oils, scratches, or contamination that may affect print quality.
Expert Tips:
- Support the drum from underneath by placing your hand under the middle of the drum
- Using your thumb against the black plastic side for stability
- This gives you a secure grip while avoiding contact with the imaging surface.
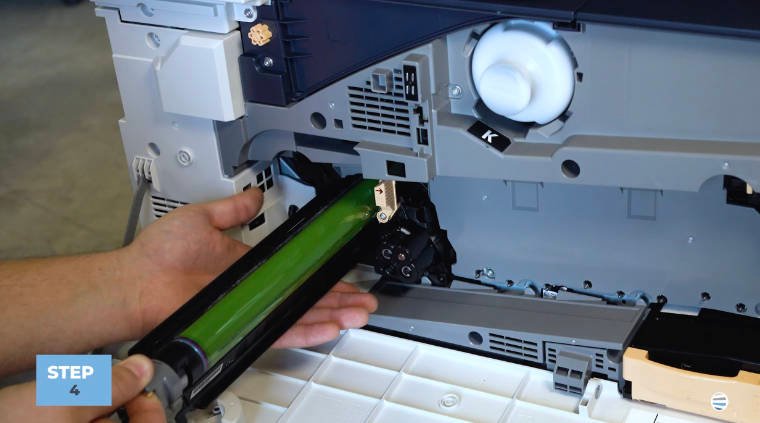
Step 5: Install the New Drum
Before inserting the replacement drum, locate the guide on the drum assembly.
You'll notice a small guide tab that aligns with a matching slot inside the copier.
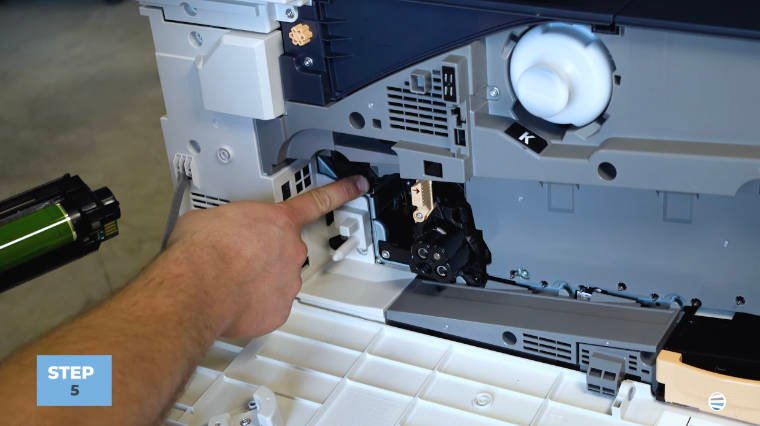
To install the new drum:
- Align the guide with the slot.
- Carefully position the drum.
- Slide the drum straight into place.
Once properly aligned, the drum should slide in smoothly.
How do you know it's installed correctly?
The drum should:
- Sit evenly in the assembly
- Slide in without force
- Fully seat inside the machine
If you encounter resistance, remove it and verify the alignment before trying again.
Step 6: Lock the Developer Assembly
Lower the developer assembly latch back into place.
This secures the newly installed drum and prepares the machine for reassembly.
Step 7: Reinstall the Waste Toner Transport Assembly
Take the waste toner transport assembly you removed earlier.
Insert it straight into position.
Use both thumbs to apply even pressure on each side while pushing it back into place.
Continue pressing until both sides click securely.
Step 8: Lock the Waste Toner Transport Assembly
Once the assembly is fully seated, relock it according to the machine's locking mechanism.
This ensures everything is secured correctly before operation.
Step 9: Close the Front Cover
Close the front cover.
Your Xerox AltaLink B8200 should now recognize the newly installed drum and be ready to return to service.
Common Drum Replacement Mistakes to Avoid
While the procedure is straightforward, there are several mistakes we commonly help customers avoid.
Touching the Green Drum Surface
This is the most common issue and can negatively affect print quality.
Forgetting to Lock the Developer Assembly
Failing to secure the latch properly may prevent the machine from operating correctly.
Misaligning the Drum During Installation
Always use the guide and slot to ensure proper alignment.
Forcing Components Back Into Place
If something doesn't fit smoothly, stop and verify alignment rather than applying additional force.
These simple precautions can help ensure a successful installation the first time.
FAQ
What does a drum do in a Xerox copier?
A drum transfers toner onto paper to create printed images and text.
Can I touch the green drum surface?
No. Touching the green surface can damage the drum and affect print quality.
How do I know when the drum needs replacing?
The copier will typically display a drum replacement message when replacement is required.
Is the drum the same thing as toner?
No. Toner is the powder used to create images, while the drum transfers those images onto paper.
What happens if the drum is installed incorrectly?
You may experience print quality issues or machine errors. Always follow the installation procedure carefully.
Proper Drum Replacement Helps Maintain Print Quality
The drum is one of the most important imaging components inside your Xerox AltaLink B8200. Replacing it correctly helps maintain sharp text, clean graphics, and reliable copier performance.
By taking your time, avoiding contact with the green drum surface, and carefully aligning the new drum during installation, you can help ensure the best possible print quality and avoid unnecessary service calls.
At STPT, we've spent decades helping organizations maintain Xerox devices, and proper drum replacement is one of the simplest ways to keep your copier performing at its best.
Want More Xerox Maintenance Tutorials?
If you found this guide helpful, be sure to subscribe to The Printing Workshop on YouTube.
By subscribing, you'll get access to:
- Step-by-step Xerox repair tutorials
- Copier maintenance and troubleshooting guides
- Toner, drum, and waste container replacement instructions
- Expert tips from experienced Xerox technicians
- Quick fixes for common printer and copier issues
Whether you're maintaining a Xerox AltaLink, VersaLink, or another Xerox device, The Printing Workshop is packed with practical advice from technicians who work on these machines every day.
Subscribe to The Printing Workshop today and gain access to more printer maintenance tips, troubleshooting advice, and how-to tutorials that help keep your devices running smoothly.
