 Skip to main content
If your Xerox AltaLink C8200/B8200 Series copier is displaying a "Replace Second Bias Transfer Roll" message, you may be wondering what this component does and whether replacing it is something you can handle yourself. The good news is that this is one of the easier maintenance procedures on the C8200/B8200 Series and only takes a few minutes when you know where to look.
Like many customer-replaceable components inside Xerox devices, the second bias transfer roll plays an important role in the printing process. Replacing it when prompted helps maintain print quality and ensures your copier continues operating as designed.
At Strategic Technology Partners of Texas (STPT), we've serviced thousands of Xerox printers and copiers for more than 40 years.
In this guide, Matthew from The Printing Workshop, a Xerox technician with several years of hands-on repair experience, will walk you through exactly how to replace the second bias transfer roll on a Xerox AltaLink C8200/B8200 Series copier.
Table of Contents
- What Is a Second Bias Transfer Roll?
- When Does a Second Bias Transfer Roll Need to Be Replaced?
- How to Replace a Second Bias Transfer Roll on a Xerox AltaLink C8200
- Common Mistakes to Avoid
- Quick Recap
- FAQ
What Is a Second Bias Transfer Roll?
A second bias transfer roll helps transfer the toner image from the copier's imaging system onto the paper during the printing process.
This component works as part of the transfer system that ensures toner is properly applied to each sheet as it moves through the machine.
When the roll reaches the end of its service life, Xerox will prompt you to replace it to maintain reliable print performance.
Although users don't replace this component as often as toner cartridges, it is a normal maintenance item that will eventually require replacement.
When Does a Second Bias Transfer Roll Need to Be Replaced?
You should replace the second bias transfer roll when the copier displays a maintenance message indicating the component has reached the end of its service life.
Most Xerox AltaLink C8200/B8200 Series devices automatically track component life and notify users when replacement is needed.
You may see:
- A maintenance alert on the touchscreen
- A "Replace Second Bias Transfer Roll" message
- A notification through your print management software
Following Xerox's replacement recommendations helps ensure reliable operation and optimal print quality.
How Do You Replace the Second Bias Transfer Roll on a Xerox AltaLink C8200/B8200?
To replace the second bias transfer roll on a Xerox AltaLink C8200/B8200 Series copier, open the left-side door, remove the existing roll using the orange release tabs, install the replacement roll, and close the door.
Below is the complete step-by-step process.
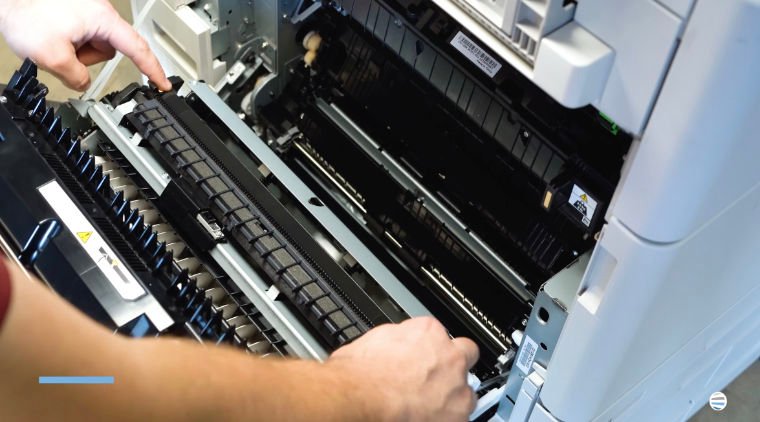
Step 1: Open the Left-Side Door
Start by opening the copier's left-side door.
The second bias transfer roll is mounted directly on the inside of this door, making it easy to access.
Once the door is open, you'll be able to locate the component and its release tabs.

Expert Tip: Take a moment to identify the orange release points before attempting removal. Xerox uses orange-colored components to indicate customer-replaceable parts.
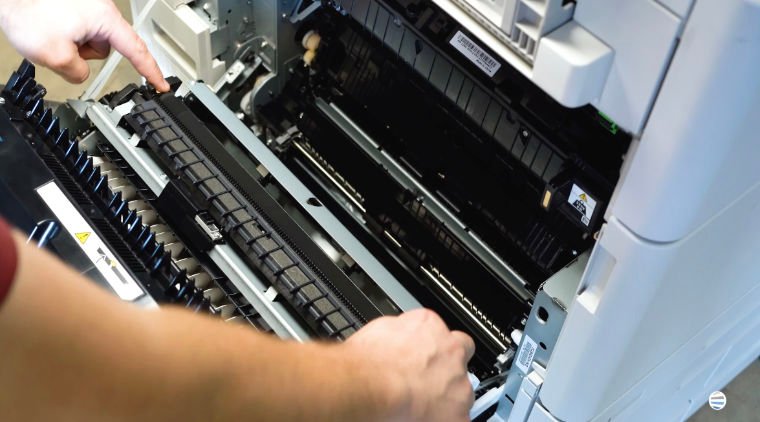
Step 2: Remove the Existing Second Bias Transfer Roll
Look for the two orange squares located on the top and bottom of the assembly.
On the bottom of each orange square, you'll find small squeeze tabs.
To remove the roll, place one hand on each side and squeeze both orange tabs simultaneously.

Then, pull the assembly straight out.
The component should release easily.
Important: Pull the roll straight out rather than twisting it. This helps prevent unnecessary wear on the mounting points.
Step 3: Install the New Second Bias Transfer Roll
Installing the replacement roll is even easier than removing it.
Simply:
- Position the new transfer roll in the same orientation as the original.
- Align it with the mounting points.
- Push it into place.
Continue pressing until the locking tabs engage.
How do you know it's installed correctly?
The second bias transfer roll should:
- Sit securely in the mounting area
- Lock into place automatically
- Not move freely once installed
You should hear or feel the tabs click into position.
A properly installed roll helps ensure reliable toner transfer during printing.
Step 4: Close the Left-Side Door
Once the replacement roll is fully installed and locked into place, close the left-side door.
The copier should recognize the newly installed component and return to normal operation.
You're now ready to get back to printing.
Common Second Bias Transfer Roll Replacement Mistakes to Avoid
This is one of the simplest maintenance procedures on the Xerox AltaLink C8200, but there are still a few mistakes worth avoiding.
Not Pressing Both Release Tabs
The roll is designed to release when both tabs are squeezed simultaneously.
Trying to remove it from one side at a time can make the process more difficult.
Twisting the Assembly During Removal
Always pull the component straight out rather than angling or twisting it.
Not Verifying the Tabs Have Locked
After installation, make sure the locking tabs have fully engaged before closing the door.
Forcing the New Roll Into Place
If the component doesn't seat easily, double-check alignment rather than applying excessive force.
These simple precautions can help ensure a quick and successful replacement.
Quick Recap
Here's the process in a simplified format:
- Open the left-side door.
- Locate the second bias transfer roll.
- Squeeze the orange release tabs.
- Pull the old roll straight out.
- Insert the new roll.
- Verify the tabs lock into place.
- Close the left-side door.
FAQ
What does a second bias transfer roll do?
A second bias transfer roll helps transfer toner from the imaging system onto the paper during printing.
How do I know when the second bias transfer roll needs replacement?
The Xerox AltaLink C8200/B8200 will typically display a maintenance message when replacement is required.
Is replacing the second bias transfer roll difficult?
No. Most users can complete the replacement in just a few minutes without special tools.
Where is the second bias transfer roll located?
The second bias transfer roll is mounted on the inside of the copier's left-side door.
What happens if the roll isn't installed correctly?
Improper installation may prevent the copier from recognizing the component or could affect printing performance.
Proper Replacement Helps Keep Your Xerox AltaLink C8200/B8200 Running Smoothly
The second bias transfer roll may be a small component, but it plays an important role in the overall printing process. Replacing it when prompted helps maintain reliable toner transfer and supports consistent print quality.
By carefully removing the old roll, ensuring the new one locks securely into place, and following the proper procedure, you can complete the replacement in just a few minutes and keep your copier operating efficiently.
At STPT, we've spent decades helping businesses maintain Xerox equipment, and simple maintenance procedures like this are often the key to reducing downtime and maximizing productivity.
Want More Xerox Maintenance Tutorials?
If you found this guide helpful, be sure to subscribe to The Printing Workshop on YouTube.
By subscribing, you'll get access to:
- Step-by-step Xerox repair tutorials
- Copier maintenance and troubleshooting guides
- Toner, drum, transfer roll, and maintenance component replacement instructions
- Expert advice from experienced Xerox technicians
- Quick fixes for common Xerox printer and copier issues
Whether you're maintaining a Xerox AltaLink, VersaLink, or another Xerox device, The Printing Workshop offers practical, easy-to-follow guidance from technicians who work on these machines every day.
Subscribe to The Printing Workshop today and gain access to more printer maintenance tips, troubleshooting advice, and how-to videos that help keep your devices running at their best.
